Getting your temporary roof anchors right is a big deal when it comes to roof safety. Along with a harness and lanyard, your temporary roof anchors are your first line of defence against a fall from height.
But selecting the right anchors and putting them in all the right places isn’t straightforward. It depends on your roof and the work required. Unfortunately, there’s no one-size-fits-all solution.
There are, however, guidelines you can use to determine the right solution for your site.
1. Position your Temporary Roof Anchors for Fall Restraint
The exact placement of your temporary roof anchors will vary per site. However, there is one golden rule you should always follow – position your anchors for fall restraint (not fall arrest).
| Fall Restraint | Fall Arrest |
|---|---|
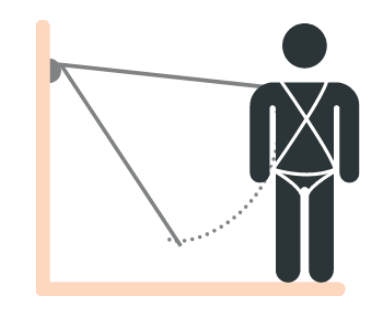 |  |
| Anchor placement keeps worker from edge | Anchor placement allows worker past edge |
To find out more about Fall Restraint vs Fall Arrest – read this article or download this poster
A fall restraint layout is designed to keep you set back from the roof edge at all times. Taking this preventative approach (coupled with correct use of your lanyard) should ideally keep you beyond the reach of any fall hazards.
To achieve fall restraint, you may only need a single well-positioned temporary roof anchor. However, in some situations you may need multiple anchors. For example, to reach and work in the far corners of a roof – or along the edge of a roof.
Below is a basic illustration of how you might approach the placement of temporary roof anchors for these scenarios:
| Hub & Spoke Layout | Permanent Static Line Layout |
|---|---|
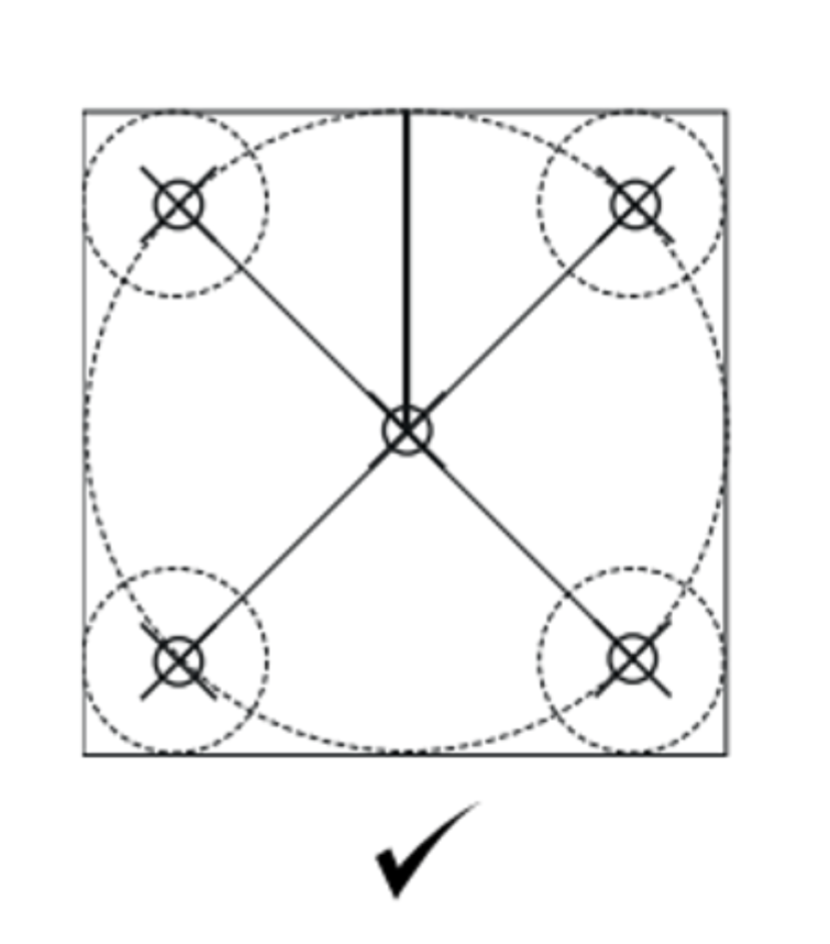 |  |
| Central anchor connected to corner anchors | Line of connected anchors along roof edge |
Source: WAHA (Illustrative Only)
Again, your temporary roof anchor placement must always be tailored to your site and work. And getting it right is important. So if in doubt, don’t hesitate to call us for guidance. Our height safety crew is also available to visit your site, determine the safest approach and install temporary anchors for you to use. As in this callout case study.
2. Shortlist Temporary Roof Anchors that Suit Your Roof
Your temporary roof anchor must suit your roof structure. Therefore, the first step in selecting the right anchor is to examine your roof structure.
How strong and well-maintained is it? What is it made of (steel, aluminium, concrete, timber)? Is it flat or sloping or ridged? Does it have a parapet or other features you need to factor in?
Based on this, shortlist suitable options from the variety of temporary roof anchors available. Start by reviewing the summary below of different anchor types (see this article for more details).
- Tie Off Adaptors & Anchor Slings: Made from webbing or wire rope. Widely applicable but use only with strong structure (and no sharp edges).
- EyeBolts & Anchor Plates: Can connect to concrete or bolt through steel. Effective but must be installed correctly.
- Tether Plates: Ideal for residential metal roofs. Can be used on steel purlins, timber or metal battens.
- Removable Anchor Bolts: Designed for use in concrete. Best for overhead or ceiling applications.
- T-Bars: Clips onto the edge of a metal deck roof sheet. Often used along with Tether Plates.
- Beam Clamps: Easy to install. Applicable for a wide range of I and H structural steel beams
- Door Jamb Anchors: Adjustable metal bar. Anchored by wedging into door or window jamb.
- Specialty Anchors: Anchor posts (concrete or shipping containers). Interchangeable screw-fix and clamp-fix anchors.
Still confused? Take advantage of our free Toolbox Talk on Temporary Roof Anchors. This specialist information session is delivered on-site by our height safety experts. Find out more here.
3. Choose a Compliant, Work-Relevant, Strength-Rated Temporary Roof Anchor
You’ve idenfied temporary roof anchors that suit your roof. But will they suit your work?
Start by considering the following: What kind of work do you need to carry out (static, mobile)? Is the anchor point compatible with your lanyard? How many people will be using the anchor?
It’s also critical to only use temporary roof anchors with the appropriate strength rating. They must be strong enough to hold the weight of all users. They must also be able to withstand any force your use may bring to bear. This includes arresting a fall from height should the worst happen.
Luckily, all anchors sold in Australia must be rigorously strength tested and rated. Below are the strength rating requirements for single and two person anchor points. Look for these details in the technical specifications of any products you’re considering. (Note: Temporary roof anchors are typically rated for one person only)
| Single Person Anchorage | Two Person Anchorage |
|---|---|
|  |
| Anchor must be rated to 15 kN (~1500kg) | Anchor must be rated to 21 kN (~2100kg) |
Temporary roof anchors sold in Australia must also comply with the AS/NZS 1891.4 (2009) or AS/NZS5532 (2013) Standards. These cover manufacturing and use requirements for industrial fall arrest systems, devices and anchors. Again, look for confirmation of compliance to this standard in your product details.
If you have any doubts, talk to an expert before you buy. And always buy your temporary roof anchors from a reputable height safety specialist. This is not the time to shop at a big box general hardware store.
4. Follow your Manufacturer’s Guidelines for Installation
It’s extremely important to remember that the installation and safe use of temporary roof anchors is your responsibility as the user. It’s therefore vital to always follow your manufacturer’s instructions to the letter. If you do not fully understand these, for your own safety, do not proceed.
Due to the above, we cannot provide any installation guidelines. However, there are some bigger picture points you may wish to consider.
One is to always take stock of the environment before commencing installation. What is the integrity of the roof structure? What is the condition of the battens or purlins or sheets the anchor is going into? Is there any visible rot? Are there obvious maintenance issues?
Another is to ensure the screws or fixings used to attach the anchor are appropriate, strength-rated and industrial-grade. (Again check your manufacturer’s instructions for specifications). Do not cut corners here by using cheaper fixings or alternatives. You may unwittingly create a weak point. Buildex is a useful site for sourcing strength-rated fixings.
Finally, it’s okay to ask for help. If don’t have the experience to select or install your temporary roof anchors, call in the experts. That’s exactly what happened on this callout case study. If required, we can even stay on to supervise your work at height and ensure you get the job done safely.
5. Ensure your Harness, Lanyard & Connectors are all Compatible
Compatibility is very important. Your temporary roof anchor suits your roof and your work requirements. But it must also work with your suite of fall arrest equipment.
For example, the connector or carabiner used on your rope must be compatible with the connecting element on your anchor point. We don’t want their gate mechanisms to inadvertently open due to a mismatch in size, shape or style.
Likewise connectors need to be compatible with your lanyard – which in turn needs to be compatible with your harness. This is how we complete our personal fall arrest system.
Luckily finding compliant, compatible, fit-for-purpose height safety equipment is not difficult. At Height Dynamics, for example, you can put this together yourself using our Roof Work Collection. Or you can purchase a variety of ready-made Roof Workers Kits.
The key is to shop with height safety specialists who can advise you along the way.